


Jeroen's
Jeroen's
Technical Corner
Technical Corner
Simulation software, tube electronics and more
Usage of Motega
| |
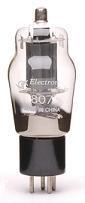
Using the Motega software is very simple. You can enter data for tubes having multiple different sections (like an ECF80 which combines a triode and a pentode), and then Motega calculates a model and generates pSpice model files. There are however some guidelines for a correct functioning of the software when entering data, especially with tubes having multiple different sections. An example of such a tube is the EABC80:
 The EABC80 combines a single and a double diode, as well as a triode section. In the following paragraphs on this page I'll use this tube as an example in how to use Motega.
The main window
A picture of the main window is given below: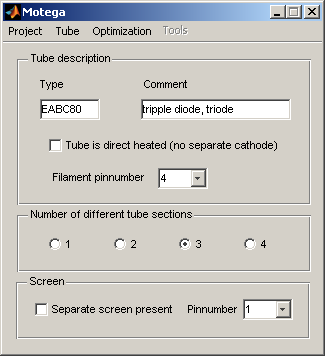 The type name that you specify for the tube is also used for the pSpice model files, so it should not contain characters that are not allowed in a filename. For the filament, you can select one pin. That sounds strange of course because a filament needs two pins, but the reason for that is that I'm absolutely not interested in modeling the filament. In datasheets however sometimes capacitances from cathode, anode or some screen to the filament are specified, and that's why I built in the possibility to select a pin. The pin you select here for the filament can be used lateron when specifying tube capacitances.
Specifying the number of different tube sections is easy, see the next examples:
The sections window
In the sections window you can specify the electrical behavior of each section: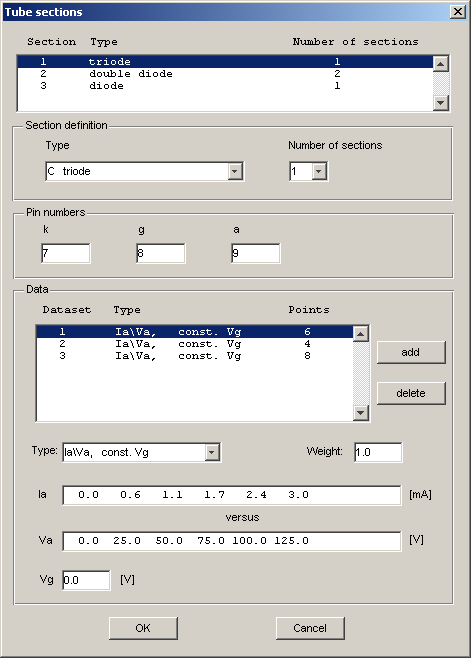 At the top of the window you find a list with as much as entries as specified in the main window for the number of 'different tube sections'. For each selected entry you can specify the electrical behavior, starting with selecting the type of section from the pull-down menu, and the number of this type of section that are present in the tube. The EABC80 for example has a single section of each of the three types, while an ECC81 has two triode sections of the same type. A double diode section forms more or less an exception to the rule. Although it is, at least by name, identified as a single section, you should specify that there are two of these sections because you should be able to specify both anode and cathode pins of the diodes.
When specifying the pins for a certain type of tube section, the number of pins selected in each edit field must equal the number of this type of tube section. Taking an ECC81 for example having its anodes connected to pins 1 and 6, you fill in a '1' and a '6' separated by one or more spaces. If pins are shared within a section, like the double diode in the EABC80 with both cathodes connected to pin 7, then this pinnumber is filled in twice (separated by one or more spaces). In the data panel you can specify sets of data which define the voltage-current relation of the selected section. The weight parameter is used in the optimization process and in fact shows how important this dataset is to you. If you have a dataset which is less important in the tube model (maybe screen grid current), then you can give it a lower weight than the default 1. By doing so, the model will better fit the other datasets. The rest of the data panel should speak for itself. Entering data
When entering data, it is best to use the following guidelines:
I don't have Ig2-data
Some datasheets do not provide data for Ig2. But you really must enter some data in order to enable Motega to calculate an Ig2-model that makes sense. Try to find the datasheet of a comparable tube, and make a rough educated guess for Ig2. Two curves of 4 points or so will do the job.
The optimization parameters window
Generally, the parameters in this window need not to be altered: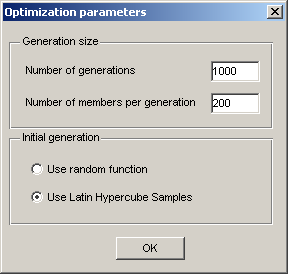 The algorithm used for optimizing the pSpice tube model is a special form of a genetic algorithm, called a 'differential evolutionary' algorithm. Such an algorithm is an iterative process, in which each iteration is called a 'generation' in case of a genetic algorithm. Every generation consists of a certain number of 'members', each of them representing a set of parameters for an entire tube model. The default values of these 'generations' and 'members' parameters give a good result, but you can fiddle with them if you want to.
Normally, the selected option for the 'Initial generation' is optimal. If you however run the source files of Motega on your own Matlab version and you don't have a license for the Statistics Toolbox, then the 'Latin Hypercube Samples' functionality is not available and Motega will switch to the random initializing function. You may choose the random function manually to see how the resulting tube model performs. Calculating a model
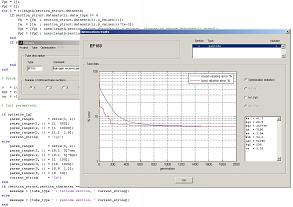
Before calculating a model, you may want to check the entered data by selecting 'Check tube data' from the menu. To be on the safe side, also make sure that you saved your project before calculating a tube model.Calculating a tube model can take a minute, after which a window pops up like this one: 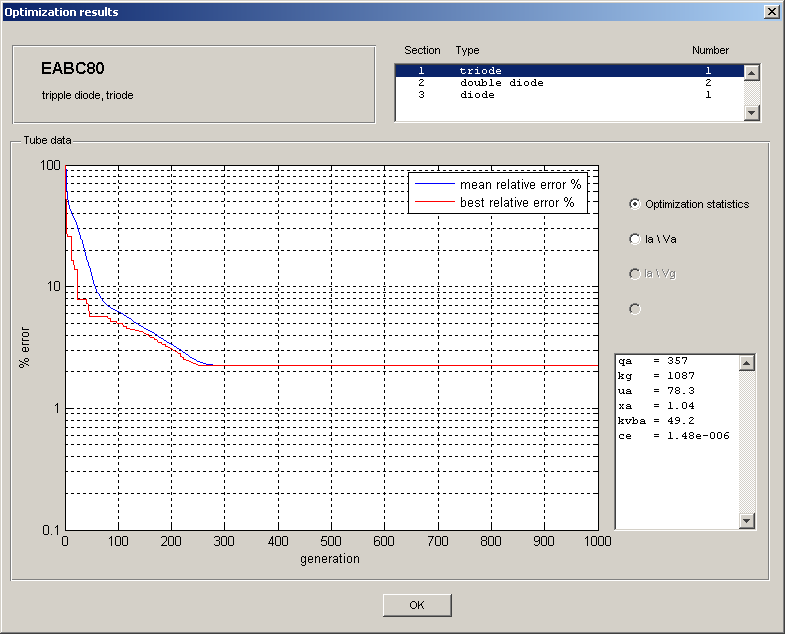 This plot shows for each selected section the achieved quality of the calculated tube model, represented by the mean percentage error between the specified datasets and the behavior of the tube model. You can see clearly that the tube model improves with each generation. If you notice that the red line is still descending at the last generation, meaning that the model has not converged yet to the best possible performance, then increase the number of generations (and/or the number of member in each generations) in the genetic parameters window and calculate the tube model again to see if the result gets better.
For each tube section you can also select a plot which shows the specified data points with red circles, and the behavior of the tube model as a blue line: 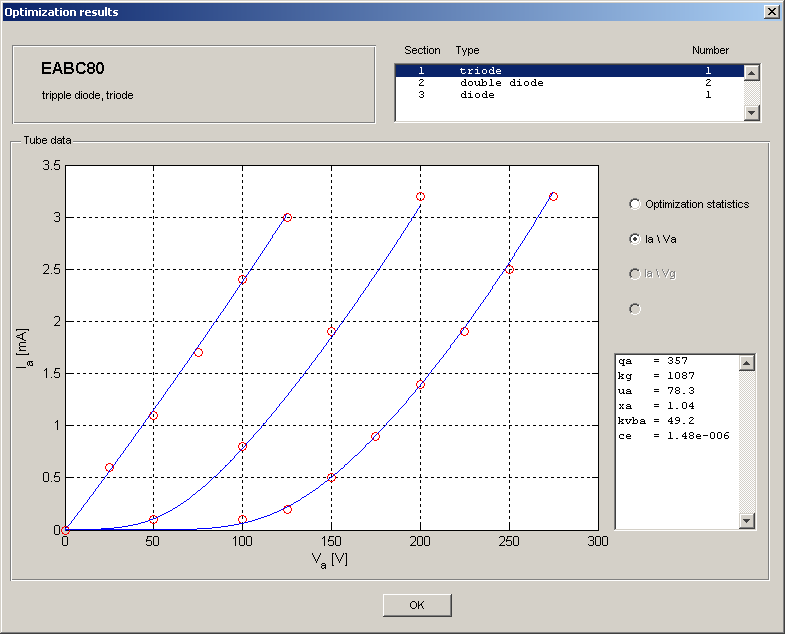 In this plot you can see how good (or bad) the tube model is optimized.
Generated output files
Several files are generated if the tube model optimization succeeds. First of all a pSpice model file is generated for the entire tube including all sections. The name of this file equals the type name of the tube. For each different tube section a file is generated also, and the type-character of the section is appended to the name of the file. In case of an EABC80 the files are:
Batch optimization
If many tube models must be calculated, then you really don't want to wait for each tube model to be finished and then have to load in another tube and start waiting over again while Motega is optimizing the model. You can however enter all tube data of several tubes and save the tube projects without calculating an optimized tube model (don't forget to select the 'Check tube data' option!), and then calculate all tube models in a single batch. Make sure all tube projects are saved and closed, then you are able to select the 'Batch optimizer' option from the menu. You will be prompted to select a folder, and the batch optimizer will then start to calculate tube models for all tube projects it finds in the specified folder. The progress is shown in a report window: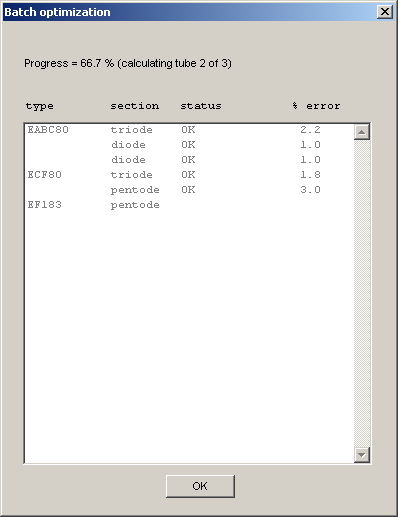 If an error occured while calculating a tube model, then this is shown in the 'status' column. After the batch processor finished, load the tube project that did not succeed manually into Motega and try to figure out the problem.
 |


